Choosing the right private online community platform can transform how your business connects with its most important audience. Whether you run a membership site, an e-learning portal, a professional association, or a live event platform, the ability to bring verified members together in a secure, moderated, real-time chat environment is no longer optional — it is a competitive necessity. RumbleTalk is an embeddable group chat solution that turns any website into a thriving private online community platform in minutes, with no custom development required.
What Is a Private Online Community Platform?
A private online community platform is a digital space where a defined group of people — members, subscribers, students, or event attendees — can communicate, collaborate, and engage in real time. Unlike public social networks, a private community is gated: users must be authenticated, invited, or approved before they can participate. This gatekeeping is precisely what makes a private online community platform so valuable for brands that want to foster trust, exclusivity, and deeper relationships with their audience.
At its core, a quality private community platform should deliver:
- Real-time messaging and group chat
- Access control and membership authentication
- Moderation tools to keep conversations professional and on-topic
- Seamless integration with your existing website or app
- Customizable branding so the chat looks like a native part of your product
RumbleTalk delivers all of these out of the box, with a lightweight JavaScript embed that works on any CMS — from WordPress to Webflow to fully custom-built platforms — without requiring backend infrastructure changes.
Why Your Business Needs a Private Online Community Platform
Community is one of the most powerful retention mechanisms available to digital businesses today. Research consistently shows that members who participate in a brand’s private community are more likely to renew subscriptions, purchase upgrades, and refer new customers. A well-managed private online community platform turns passive visitors into active stakeholders who feel genuinely invested in your brand’s success.
Here is what a private community delivers for your bottom line:
Controlled Access and Membership Tiers
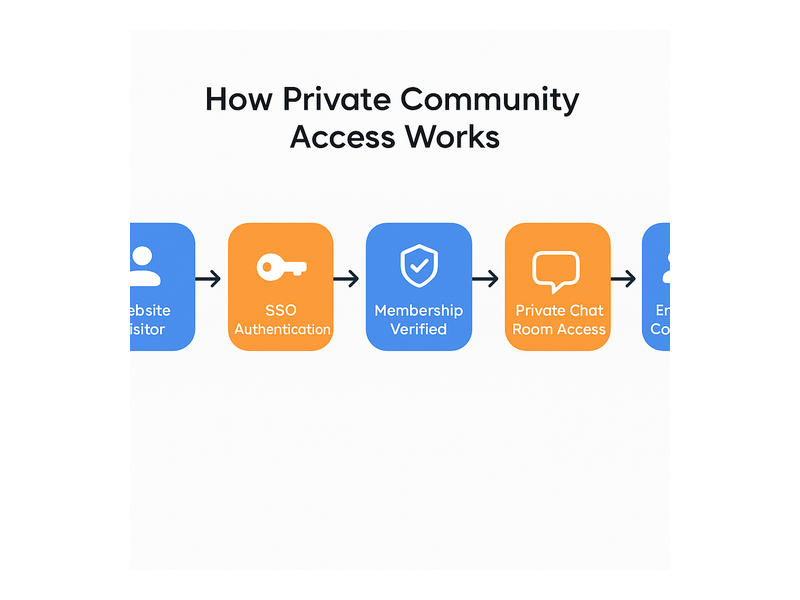
With a private online community platform, you decide who gets in and at what level. RumbleTalk supports Single Sign-On (SSO), token-based login, and password-protected rooms, so you can tie chat access directly to your membership or subscription tiers. A free-tier member might access a general channel, while premium subscribers unlock private rooms with exclusive content and direct access to experts or moderators. This layered access model creates a powerful incentive structure that drives upgrades and long-term retention. For a deeper look at how SSO works in practice, see our post on Chat SSO Integration for Websites.
Real-Time Engagement That Builds Loyalty
Static forums and asynchronous comment threads are no longer enough. Today’s audiences expect real-time interaction. A private online community platform built on RumbleTalk gives your members live group chat, direct messages, file sharing, GIF support, audio messages, polls, and more — all within a branded interface that feels like a natural extension of your website. This immediacy is especially critical during live events, product launches, or expert Q&A sessions where engagement happens in the moment and loses value if delayed.
Members who experience real-time connection with your brand and with each other develop a sense of belonging that no email newsletter or social media post can replicate. That sense of belonging is what reduces churn and builds communities that sustain themselves organically over time.
Key Features to Look for in a Private Online Community Platform
Not all community platforms are created equal. When evaluating a private online community platform for your business, prioritize the features that align with your specific audience and operational needs. Here is what separates enterprise-grade community chat from generic chat widgets.
Robust Moderation Tools
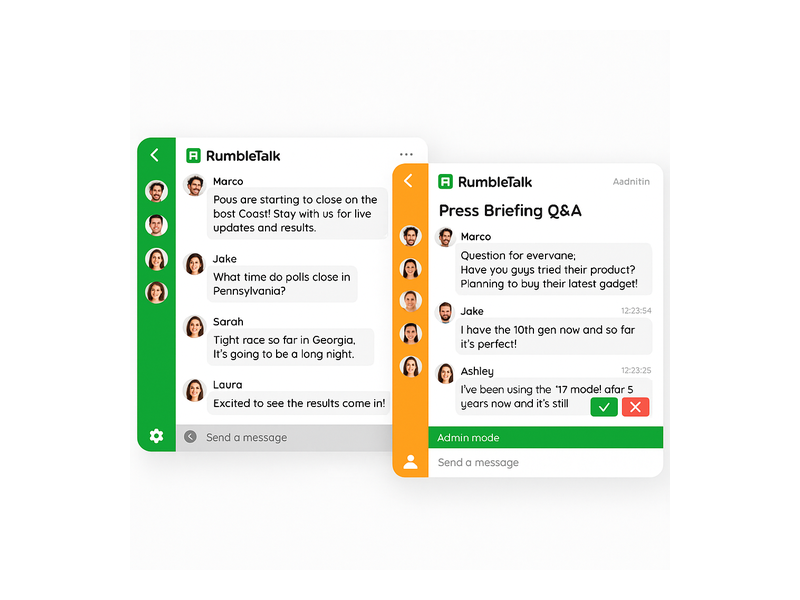
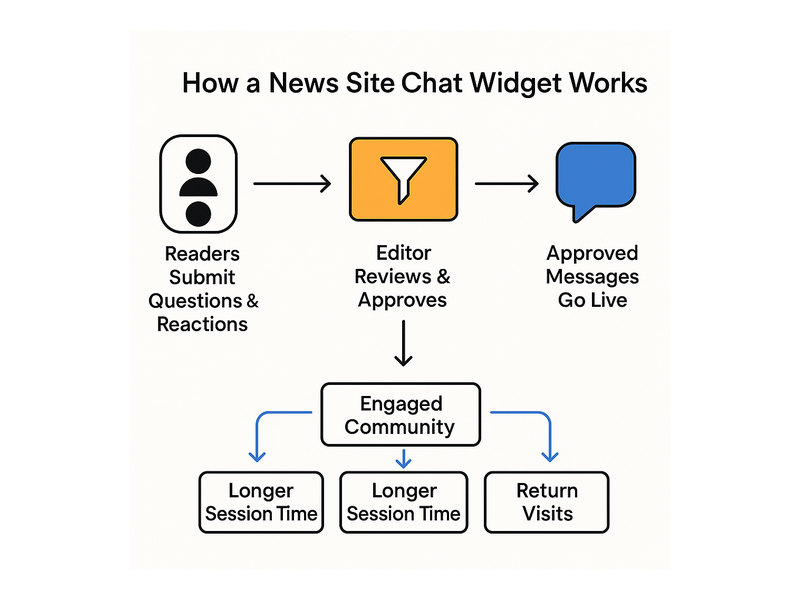
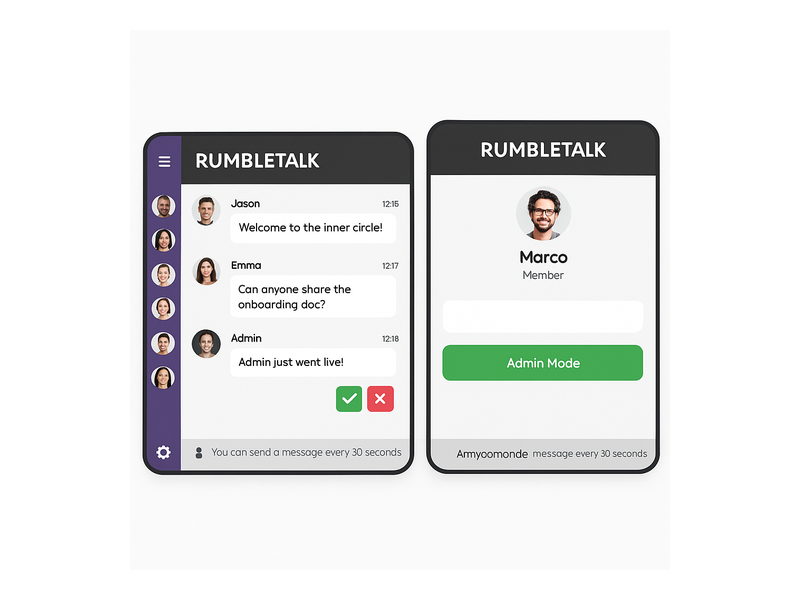
Any private online community platform worth deploying must give admins powerful moderation capabilities. With RumbleTalk, admins can mute, ban, or shadow-ban disruptive members, approve messages before they appear publicly using Admin Mode, set rate limits (for example, one message every 30 seconds) to prevent spam, and pin important announcements at the top of the chat. These tools ensure your private community remains a professional, welcoming environment that members actively want to return to — and that new members feel safe joining.
SSO and Role-Based Authentication
Friction kills community participation. Integration with your existing authentication system is non-negotiable for a serious private online community platform. RumbleTalk’s SSO support means that when a member logs into your website, they are automatically authenticated in the chat room without a separate login step. You can pass custom user data — display name, avatar, membership role, and tier — through the SSO token so each member’s identity in the chat precisely matches their profile on your platform. Admins automatically receive elevated permissions in the chat, while standard members get read/write access appropriate to their tier.
Embeddable Chat That Lives on Your Domain
A private online community platform should live on your website, not pull your users away to a third-party app. RumbleTalk’s embeddable Members Chat widget drops into any webpage with a single JavaScript snippet. You keep your users on your domain, protect your brand equity, and maintain full control over the member experience. The chat is fully responsive and performs flawlessly on mobile, tablet, and desktop without any additional configuration.
Analytics and Admin Dashboard
Understanding how your community communicates is essential for sustained growth. RumbleTalk’s admin panel gives you message logs, user activity reports, peak engagement time data, and user management controls. Use these insights to schedule live events when your audience is most active, identify your top contributors, spot the topics that generate the most conversation, and catch policy violations before they escalate. Data-informed community management turns a good private platform into a great one.
Scalability for Any Audience Size
As your private online community platform grows, your chat infrastructure must scale seamlessly with it. RumbleTalk handles thousands of concurrent users without performance degradation, making it equally suitable for a boutique membership community with fifty active members and a large-scale virtual conference with ten thousand simultaneous attendees. You never need to worry about the chat going down at the worst possible moment.
How RumbleTalk Powers Your Private Online Community Platform
RumbleTalk is purpose-built for website owners and platform operators who want to launch a private online community platform without building custom real-time infrastructure from scratch. Here is how the setup works end to end:
- Create your chat room — sign up at RumbleTalk, configure a Members Chat or Social Chat room, and customize the design to match your brand’s colors, fonts, and logo. No design or development skills required.
- Set your access rules — define who can enter: password-protected, SSO-authenticated, or invite-only. Create multiple rooms with different access levels for different membership tiers, topics, or cohorts.
- Embed on your site — copy the JavaScript snippet and paste it into any page. The chat loads instantly and does not negatively affect your page speed or Core Web Vitals scores.
- Moderate and manage — use the admin dashboard to monitor conversations in real time, approve messages, manage user roles, export chat logs, and enforce community guidelines.
- Drive engagement with live events — schedule live Q&A sessions, AMAs, expert panels, or community calls directly in the chat, turning your private online community platform into a live event hub that members look forward to attending.
For a step-by-step walkthrough of the initial setup process, visit the RumbleTalk Getting Started Knowledge Base.
Use Cases: Who Benefits Most from a Private Online Community Platform?
The value of a private online community platform spans industries and business models. Here are the most common and highest-impact use cases where RumbleTalk delivers measurable results for B2B operators.
Membership Sites and Subscription Communities
If you run a membership site — whether it is a premium newsletter, a curated resource library, a niche news publication, or a professional peer group — your members joined because they want to connect with like-minded people, not just consume content. A private online community platform gives them that connection. RumbleTalk’s Members Chat lets you segment your audience by tier, interest, or cohort, creating targeted chat rooms that feel exclusive and genuinely valuable. When your members can talk to each other inside your product, they have a reason to stay that no competitor can easily replicate.
E-Learning Platforms and Online Courses
Students consistently learn better when they can ask questions, share resources, and collaborate with peers and instructors in real time. An e-learning platform that integrates a private online community platform directly inside each course module sees higher completion rates, stronger peer accountability, and better word-of-mouth referrals. RumbleTalk’s moderated Q&A mode lets instructors field questions from dozens or hundreds of students simultaneously without losing control of the conversation. The Queued Chat feature is especially powerful for instructor office hours, ensuring every question gets addressed in an orderly, structured format.
Professional Networks and Industry Associations
Industry associations, professional networks, and peer advisory groups need a private online community platform that reflects the seriousness and decorum of their audience. RumbleTalk’s clean, professional interface — combined with strict moderation controls, role-based access, and the ability to keep conversations entirely within your own domain — makes it ideal for lawyers, financial professionals, healthcare practitioners, and other regulated industries where compliance and privacy are non-negotiable. Members communicate confidently knowing that the community is private, moderated, and not indexed by search engines.
Live Events, Webinars, and Virtual Conferences
Live events are a natural and high-value home for a private online community platform. When attendees can engage with each other and with speakers in real time during a webinar or virtual summit, audience retention and satisfaction scores increase dramatically. RumbleTalk powers chat for virtual conferences, product launches, live webinars, and online summits of all sizes. The Moderated Q&A mode keeps speaker sessions focused and professional, while the group chat keeps the broader audience connected between scheduled sessions, extending the engagement window far beyond the event itself.

SaaS Products and Customer Communities
SaaS companies often need a private online community platform for user onboarding support, customer success, or developer relations. Embedding a community chat room directly inside your product dashboard gives users a place to ask questions, share tips, report bugs, and provide feature feedback without ever leaving your application. This approach reduces support ticket volume, increases product adoption, and dramatically lowers churn by increasing the perceived value of belonging to your product’s ecosystem.
Best Practices for Running a Successful Private Online Community Platform
Launching a private online community platform is only the beginning. Sustaining high engagement levels requires deliberate community design and consistent management. Here are the practices that the most successful community operators apply:
- Publish clear community guidelines — pin your rules in a visible location so every new member understands expected behavior from their very first session.
- Assign dedicated community managers — active human moderation signals that the space is valued and maintained, which encourages members to engage more freely and more frequently.
- Schedule recurring live events — weekly AMAs, monthly expert chats, or quarterly town halls give members a compelling reason to show up at a specific time, creating shared experiences that build loyalty that passive content cannot match.
- Segment by topic or role — create multiple focused chat rooms so members can self-select into conversations most relevant to their job function, interest area, or membership tier.
- Surface great conversations — use pinned messages, weekly digests, or curated highlights to amplify the best discussions and show prospective members what makes your private community worth joining.
- Recognize top contributors — publicly acknowledge your most active and helpful members (with their permission) to reinforce a culture of generosity and mutual support.
A well-run private online community platform does not just attract members — it retains them indefinitely. When your community becomes the place where the best conversations in your industry happen, members have a powerful and deeply personal reason to maintain their subscriptions year after year.
Why RumbleTalk Is the Ideal Private Online Community Platform for B2B Brands
Standalone community platforms like Circle, Mighty Networks, and Slack are feature-rich, but they also pull your users away from your website, brand your community with their logo, and impose per-member pricing that grows unsustainably as your audience scales. RumbleTalk takes a fundamentally different approach built around your brand and your domain.
With RumbleTalk, your private online community platform lives on your website, under your brand, without any third-party logo or redirect. The embed is lightweight, fast, and fully customizable to match your visual identity. Because RumbleTalk specializes in real-time group chat for websites and live events, every feature — moderated Q&A, SSO authentication, queued messaging, admin controls — is purpose-built for the specific use cases that matter most to B2B platform operators.
Whether you need a single members-only chat room or a complex multi-tier private community with dozens of segmented rooms across multiple membership levels, RumbleTalk scales to fit your requirements without custom development, backend infrastructure changes, or long implementation timelines.
Start Building Your Private Online Community Platform Today
Building a thriving private online community platform does not have to be a months-long engineering project or a budget-breaking investment. RumbleTalk gives you everything you need to launch a secure, branded, real-time member community on your website — ready in minutes, not months.
Your members are looking for connection, not just content. Give them a private online community platform they will look forward to visiting every day. Visit RumbleTalk to start your free trial and see firsthand how easy it is to transform your website into a destination your audience loves and stays for.